The BonesPro Modifier
The BonesPro modifier is the main component on the BonesPro plug-in. It is used to dynamically deform an object depending on the animation of other objects (called ‘bones’) that are assigned to it. To apply BonesPro perform the following steps:
Select the object you want to deform
Go to the Modify tab and open the Modifier List dropdown
Select BonesPro from the list. This applies BonesPro to your object and opens the BonesPro user interface rollouts
The Main Rollout
This rollout is always visible while the BonesPro modifier is selected on the object’s modifier stack. This chapter describes all the available options of the main BonesPro rollout:
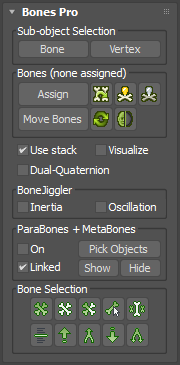
Sub-object Selection
These buttons are used to navigate between the different selection modes. Alternatively you can also use the default sub-object selection options in the modifier stack or the default 3ds Max keyboard shortcuts to switch between selection modes : CTRL-B toggles sub-object mode, INSERT switches between the sub-object selection modes and 1 and 2 jump directly into bones or vertex mode)
Bone - this toggles the modifier between the Bone sub-object mode and the normal modifier selection.
Vertex - this toggles the modifier between the Vertex sub-object mode and the normal modifier selection.
Bones
These buttons deal with the assignment and display of bones.
Assign - This button opens a selection dialog where you can pick the objects you want to use as bones for the deformation of your mesh. This can be bones from the 3ds Max bone system, character studio skeletons, CAT rigs or any normal mesh. BonesPro automatically checks if the bone selection is linked and has a root node. If a root node is found BonesPro will offer you the option to link your mesh to this root.
Copy - This button is used to copy the Bone assignments from another object that has BonesPro applied. Use this option when you have multiple objects that share the same set of bones, for example a character and different objects of clothing.
Show Bones - Unhides all assigned bones that are currently hidden.
Hide Bones - Hides all assigned bones. This makes it easier to concentrate on the look of the mesh while you are deforming.
Move Bones - This opens a dialog where BonesPro modifiers in the scene can be temporarily made to ignore assigned bones so that those bones can be moved into new positions. While the move option is active for a modifier, bone transformations will not cause related mesh deformations. Enable this option to reposition or modify the actual bones, then enable it again to have the mesh react to the bones again. The move state of any BonesPro instance in the scene can be enabled and diabled through any other modifier’s Move Bones button. This allows users to adjust bones that affect multiple different meshes at the same time.
Refresh - Refreshes the display of the geometry.
Hide Mesh - This toggle button hides the object’s mesh from view and reveals it again.
Visualize
Use stack - When this option is checked BonesPro considers mesh deformations from other modifiers in the stack beneath BonesPro.
Visualize - When this option is checked the strength and falloff for selected bones is displayed on the mesh by coloring its vertices in a range from red (maximal influence) to blue (no influence). If no bones are selected the visualization shows instead the influence of dual quaternion blending on the vertices. This option can also be toggled with the keyboard shortcut ALT+V
Dual Quaternion - This option enables or disables dual quaternion weight blending for the whole mesh.
BoneJiggler
These checkboxes control if the mesh is influenced by BoneJiggler modifiers. If you have no BoneJiggler modifiers applied to any bones you can ignore these options.
Inertia - When this option is checked the mesh deformation will be influenced by the Inertia settings of the bones that have BoneJiggler modifiers. This will cause bones to lag behind when accelerating and skid over and wobble back when decelerating
Oscillation - When this option is checked the mesh deformation will be influenced by the Oscillation settings of the bones that have BoneJiggler modifiers. This adds harmonic oscillations to the bone to create pulsing and rotating deformation effects.
ParaBones & MetaBones
These options control if ParaBones and MetaBones are influencing the mesh. If you have no ParaBones or MetaBones linked to any bones you can ignore these options.
On/Off Toggle - When checked the mesh deformations take ParaBones and MetaBones into consideration. While this is unchecked the mesh will ignore all ParaBones and MetaBones, even if they are linked to assigned bones. This option can also be toggled with the keyboard shortcut ALT+M
Pick Objects - This opens a dialog window in which ParaBones and MetaBones can be assigned to the BonesPro modifier. This makes it possible to have BonesPro affected by deformers that are not linked into the bone hierarchy at all.
Linked - If this option is checked BonesPro behaves like older versions of the plug-in and considers all ParaBones and MetaBones that are linked to one of the assigned bones. Other ParaBones or MetaBones that are added through the Pick Objects dialog are also considered in addition to the linked ones. If this option is unchecked link relationships are ignored and only the bones explicitely added through the Pick Objects dialog are considered.
Hide - Hides all assigned ParaBones and MetaBones.
Show - Unhides all assigned ParaBones and MetaBones.
You can also use the keyboard shortcut ALT+O to toggle between the show and hide option for ParaBones and MetaBones
Bone Selection
This group contains various options to select bones. Bone selection works independently from the normal 3ds Max object/sub-object selection. This allows you to have assigned bones and mesh vertices selected and highlighted at the same time.
Select all Bones - Selects all bones that are assigned to the object.
Deselect all bones - Clears the object’s bone selection.
Invert bone selection - Inverts the object’s bone selection. All previously selected bones become unselected, all previously unselected bones become selected.
Interactive bone selection - This interactive selection allows you to pick bones with the mouse directly in the viewport. You can hold CTRL while clicking on bones to select multiple bones and ALT to unselect selected bones. If the SHIFT key is held while selecting a bone it will automatically receive the strength and fallof of the current bone selection. This can be used to quickly copy bone settings to other bones. The mouse cursor changes to a hand icon to display that this selection mode is active.
Interactive selection for unlinked bones - This is another interactive selection option. It selects all bones that are not linked to the bone you click on. The mouse cursor changes to a hand icon to display that this selection mode is active.
Select bones by name - Opens a ‘Select by Name’ dialog in which you can modify the bone selection.
Select parent bone - Selects the parent bones of all currently selected bones and deselect the current selection. This essentially moves the selection up in the link hierarchy. Keyboard shortcut: Page Up
Select parent bone hierarchy - Selects the whole parent hierarchy (parent, grandparent, etc.) for each currently bone, up to the root of the linked tree. Keyboard shortcut: CTRL + Page Up
Select child bones - Selects all child bones (but not grandchildren) of all currently selected bones while deselection the current selection. This essentially moves down in the link hierarchy. Keyboard shortcut: Page Down
Select child bone hierarchy - Selects the whole child hierarchy (children, grandchildren, etc.) for each currently selected bone. Keyboard shortcut: CTRL + Page Down
The Bones Rollout
This rollout allows you to modify the parameters of selected bones that control their general influence over the object’s mesh. The rollout is displayed whenever you are in the bones sub-object mode. To enter the bones sub-object mode use the Bones button in the main rollout or the 3ds Max default sub-object selection options.

Modify Bone Influence
Falloff - The Falloff spinner determines the influence radius of the bone. Increasing the influence radius causes vertices further away from the bone to be affected.
Strength - This spinner modifies the total influence a bone has on the mesh. Increasing the influence strength not only affects vertices within the bone’s influence radius to a higher degree but it also increases the radius itself.
Real-Time - By default all changes to falloff and strength are immediately applied to the selected bones and the mesh deformation and viewport visualization change in real-time. If you are working with an object that has a very high polycount this might cause inconvenient slowdowns while you adjust spinners. For those cases you can disable real-time mode and modify bone settings without causing immediate viewport updates.
Apply - If Real-Time mode is disabled this button is used to apply changes to the spinners to the mesh. This is not necessary while real-time mode is enabled.
Sync - A bone can be part of different BonesPro modifiers that are applied to different objects. By default influence changes done to a bone only affect the current object and its BonesPro modifier. When you enable sync mode the changes to a bone’s strength and falloff are automatically applied to that bone within all existing BonesPro modifiers.
Create Selection Set - Opens a dialog that allows you to conveniently create selection sets containing all assigned or all currently marked bones.
Replace Bone - Opens a selection dialog to pick a replacement for the currently selected bone. BonesPro retains all settings of the original bone (falloff, strength, individual weights) but applies them to the new geometry in the future.
The Vertices Rollout
The Vertex mode rollout allows you to fine tune the influence that individual bones have over individual vertices. It is displayed whenever you are in the vertex sub-object mode. To enter the vertex sub-object mode use the Vertex button in the main rollout or the 3ds Max default sub-object selection options.
The rollout is divided into 2 main groups. The first group (Select) offers various tools to make it easier to select specific groups of vertices in the mesh. The second group (Modify) offers you different ways to override the default influence (which depends on the bone’s strength and falloff) for those selected vertices.
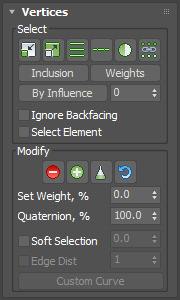
Select
Shrink - Reduces the vertex selection area by deselecting the outermost vertices. If the selection size can no longer be reduced, the remaining vertices are deselected. Keyboard shortcut: -
Grow - Expands the selection area outward in all available directions. Keyboard shortcut: +
Ring - Selects a ring or rings based on the current vertex selection. Keyboard shortcut: ALT+R
Loop - Selects a loop or loops based on the current vertex selection. Keyboard shortcut: ALT+L
Invert vertex selection - Inverts the vertex selection. All previously selected vertices become unselected, all previously unselected vertices become selected.
Unlinked Vertices - Opens up a small menu that allows the user to make vertex selections in relation to the influences of bones that are not linked with the currently selected bones.
Select - Selects all vertices whose main influence comes from bones that are not linked to the current selection. Already selected vertices stay selected.
Deselect - Deselects all vertices whose main influence comes from bones that are not linked to the current selection.
Select only - Selects all vertices whose main influence comes from bones that are not linked to the current selection and selects all others.
Exclude - Excludes all vertices whose main influence comes from bones that are not linked to the current selection.
Include - Includes all vertices whose main influence comes from bones that are not linked to the current selection.
Inclusion - Opens up a small menu that allows the user to make vertex selections in relation to their inclusion state. Each of the available options allows a choice between Select (selects the affected vertices, already selected vertices stay selected) Deselect (deselects the affected vertices) and Select only (selects the affected vertices and deselects all others).
Excluded - Selects or deselects all Vertices that are explicitly excluded from at least one selected bone.
Included - Selects or deselects all Vertices that are included by at least one selected bone.
Maximum - Selects or deselects all Vertices whose most influential bone is selected.
Weights - This option displays a table that lists the current weights for each bone/vertex pair. Clicking the button gives you a choice between Select (selects the affected vertices, already selected vertices stay selected) Deselect (deselects the affected vertices) and Select only (selects the affected vertices and deselects all others).
By Influence - This option allows you to select all vertices that are influenced to at least the given percentage by one of the currently selected bones.
Ignore Backfacing - When this option is enabled vertices of backfacing polygons are not selected. This only applies to manual vertex selection in the viewport, not any of the influence or topology dependent selection options.
Select Element - When this option is enabled selecting vertices also selects all other vertices of the element automatically. This only applies to manual vertex selection in the viewport, not any of the influence or topology dependent selection options.
Modify
Exclude from bones - This option removes all influence from the selected bones for the selected vertices. Keyboard shortcut: CTRL+X
Include into bones - This option allows you to include the selected vertices back into the influence of the selected bones. Keyboard shortcut: SHIFT+X
Effects - Clicking this button brings up a popup dialog that lets you set certain bone influence effects:
Bones Limit - This option is used to adjust the overall number of bones that can affect a vertex. You can define if the change is applied to all vertices in the mesh or only the selected vertices.
Equalize - This option equalizes the influence that the selected bones have over the selected vertices. Please not that the whole influence for a vertex will be evenly distributed between the selected bones and all unselect bones will not influence the vertex at all anymore.
Reset - This button lets you undo the weight and inclusion manipulations that have been done.
Set Weight - This control is used to set a specific forced weight for bone/vertex pairs. These explicit weights override the default weights that are based on natural proximity. The forced weights define the percentage of overall control that bones have over a vertex. If a vertex has 30% forced weight from bone 1, 30% forced weight from bone 2 and no forced weights on other bones then bones 1 and 2 will each have 30% control over the vertex. The remaining 40% of total influence are shared by the remaining (non-excluded) bones. The distribution of influence between those other bones is calculated based on the normal proximity based calculation. If the sum of forced weights for a vertex exceeds 100% the influence is distributed proportionally. If bone 1 has 60% forced weight influence over a vertex and bone 2 has 90% forced weight influence over it, the bones will share the influence over the vertex with a proportion of 60/90 or 2/3, which equals 40% weight for bone 1 and 60% weight for bone 2. In this case other bones will not influence the vertex at all, even if they are in close proximity and are not excluded.
Quaternion - This control is used to set a specific dual quaternion blend weight for the selected vertices.
Soft Selection - When Soft Selection is enabled, additional vertices around your selected vertices will be influenced with reduced weights to create a smooth transition from the forced vertices to the rest of the mesh. Adjust the spinner to modify the influence radius of the Soft Selection.
Edge Distance - This option limits the soft selection radius to only affect vertices that are within a certain distance of connected edges.
Custom Curve - Soft selection normally uses a linear falloff. For specific demands a customized falloff curve can be generated.
The Mirror Rollout
Since many bone rig setups include at least one symmetry axis, the mirror functionality that is provided by this rollout is an important time saver. You can transfer weight and inclusion settings from one bone to its counterpart. Symmetry for the mirror tool is determined by the position of bones at the moment at which you assign them to the BonesPro modifier. Therefore you can use the time slider to animate your rig without losing symmetry properties when the bones move out of alignment.
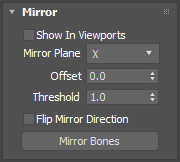
Show in Viewports - While this option is checked the viewports will display helper gizmos that support you while you are setting up the mirror parameters. An orange outline represents the position and axis orientation of the plane along which the data will be mirrored. Bones which are identified as counterparts of selected bones are marked with a colored bounding box. This provides you with a real-time preview when you are adjusting the position of the mirror plane. Arrows on the plane display the direction into which the data gets copied. This is a visual reference to determine which side of the object gets copied to the other one.
Mirror Plane - This option determines the orientation of the mirror plane.
Offset - If your mesh (or the region you want to mirror) is not oriented along the world coordinate system’s root you can use this spinner to move the mirror to the intended position.
Threshold - If the bone rig is not exactly symmetrical or the mirror plane is not exactly positioned at the symmetry axis the mirror tool can have problems to identify the correct counterpart bones. You can use this spinner to adjust the sensitivity of the counterpart detection. Increase this value if the correct counterpart bones are not detected (and accordingly marked in the preview) correctly. If you increase this value too much the tool might identify the wrong bones as counterparts.
Flip Mirror Direction - This checkbox toggles which side copies its settings to the other side. The arrows in the viewport helper gizmo always show the currently used mirror direction.
Mirror Bone Settings - Pressing this button will copy all settings for selected bones over to their mirror counterparts.
The Paint Rollout
The paint tool allows you to modify weight assignments between bones and vertices interactively by painting over the mesh surface. The painter is very similar to the standard 3ds Max paint tool, so you’re most likely already familiar with its usage. Just painting over the mesh without holding any keyboard buttons will increase the weight of the painted vertices in relation to the currently selected bones. Furthermore the following key combination produce alternative effects:
ALT - While ALT is pressed the brush will decrease the weights for the affected bone/vertex pairs instead of increasing it.
SHIFT - While SHIFT is pressed the brush will even out weight differences between vertices within its paint radius. You can use this to smooth the weight transition between adjacent vertices.
CTRL+SHIFT - Allows you to interactively adjust the brush radius without accessing the options window.
ALT+SHIFT - Allows you to interactively adjust the brush strength without accessing the options window.

Paint - Toggles the interactive paint mode. While the paint mode is active a paint brish gizmo will be attached to the mouse cursor and vertex weights in relation to the selected bones can be modified by painting over them.
Options - Opens the options dialog that allows you to modify the brush settings.
Ignore Exclusions - While this option is enabled the painter will ignore excluded bone/vertex pairs completely and not adjust their weights. When this option is disabled the exclusion state can be influenced by painting over the vertices. Increasing the weight will automatically include then, decreasing it to 0 will exclude them.
Paint Quaternion Blend - As an alternative to skin weight painting the paint mode can also be used to adjust the influence of normal linear blend deformation and dual quaternion blending.
The Properties Rollout
This rollout provides you with licensing information and options for skinning data import and export.

Export - Clicking on the Export button opens up a pop-up menu that enables you to export BonesPro data. There are three different formats available for export. For details about the export data refer to the chapter BonesPro Export File Format.
BonesPro Data Format (*.bpm) - This is a binary file format containing the whole bones data.
Structure - This exports the whole bone/vertex rig setup in a plain text ASCII file. It is a snapshot of the moment when the mesh was attached to the skeleton and contains no animation information.
Animation - The Animation file stores the bone and vertex data for a specified animation interval in a plain text ASCII file.
Import - This button launches a file open dialog box that lets you read in a previously created .bpm file.
Skin Export - Places a new Skin modifier on top of the modifier stack and adds the BonesPro deformation data to it. Please take care that MetaBone, Parabone and BoneJiggler data can not be exported since there are no corresponding features available in the Skin modifier.
Skin Import - Retrieves the deformation data of the topmost Skin Modifier on the modifier stack and adjusts the BonesPro deformation accordingly.
About - Provides general information about BonesPro.
Options - This button opens the BonesPro options menu that allows you to modify the following settings:
Minimum Width - With this spinner you can enforce a minimum size for bone influence calculations. Normally the size of the bone object itself defines this size and the default is fine. In special cases when you work with bones that have no actual size this setting can be used to enforce a certain influence area for these bones.
Tolerance - This spinner defines the minimal influence a bone has to have over a vertex to exert any influence at all. The default value of 1% means that all bones with less than 1% influence over a vertex are ignored to speed up the calculation. These small influences have only negligible effect for the deformation quality and filtering them out speeds calculations up significantly. If you set this spinner to 0% influences of all bones will be considered to provide exact results.
Default Strength - This sets the default strength for bones that are not assigned an explicit strength override.
Default Falloff - This sets the default falloff for bones that are not assigned an explicit strength override.
Show information messages - This allows you to disable the information messages that BonesPro shows on certain actions.
Show confirmation messages - This allows you to disable the confirmation messages that BonesPro shows on certain actions. You should carefully consider if you really want to disable those messages because they usually warn about major changes to the skeleton rig setup.
Allow end result toggle - The ‘show end result’ toggle for the stack is usually disabled while you are working with BonesPro. Other modifiers above BonesPro can significantly change the mesh topology which makes edits based on vertex selections problematic to work with while the final result is shown in the viewport. But in some cases you might prefer to see the final result while modifying the mesh deformations and therefore you can enable the toggle through this option. Be advised that displayed vertices and selection options might be irritating while the end result is shown because all operations are based on the state without subsequent modifiers.
Colors - These color swatches allow you to select the colors of selected bones and control strength gradients of the viewport visualization. The second column allows a similar adjustment for the dual quaternion blend visualization.